Blog
Automating Mobile App Deployments
By Camilo Calvo-AlcanizIntroduction
Mobile app deployments are a major pain point for developers, as they require multiple steps to deploy to iOS and Android app stores and are often prone to errors. In this domain, automation is critical to avoid build issues and allow your organization to push releases out quickly. This article will walk you through a clean and simple approach to perform application deployment automation using the industry standard automation server Jenkins.
This article was written from the perspective of developers who build both their iOS and Android apps from a single codebase (in this instance, using the Capacitor runtime). However, the same steps will hold if you are in charge of automating the deployment of a native app written in Swift, Java, or Kotlin.
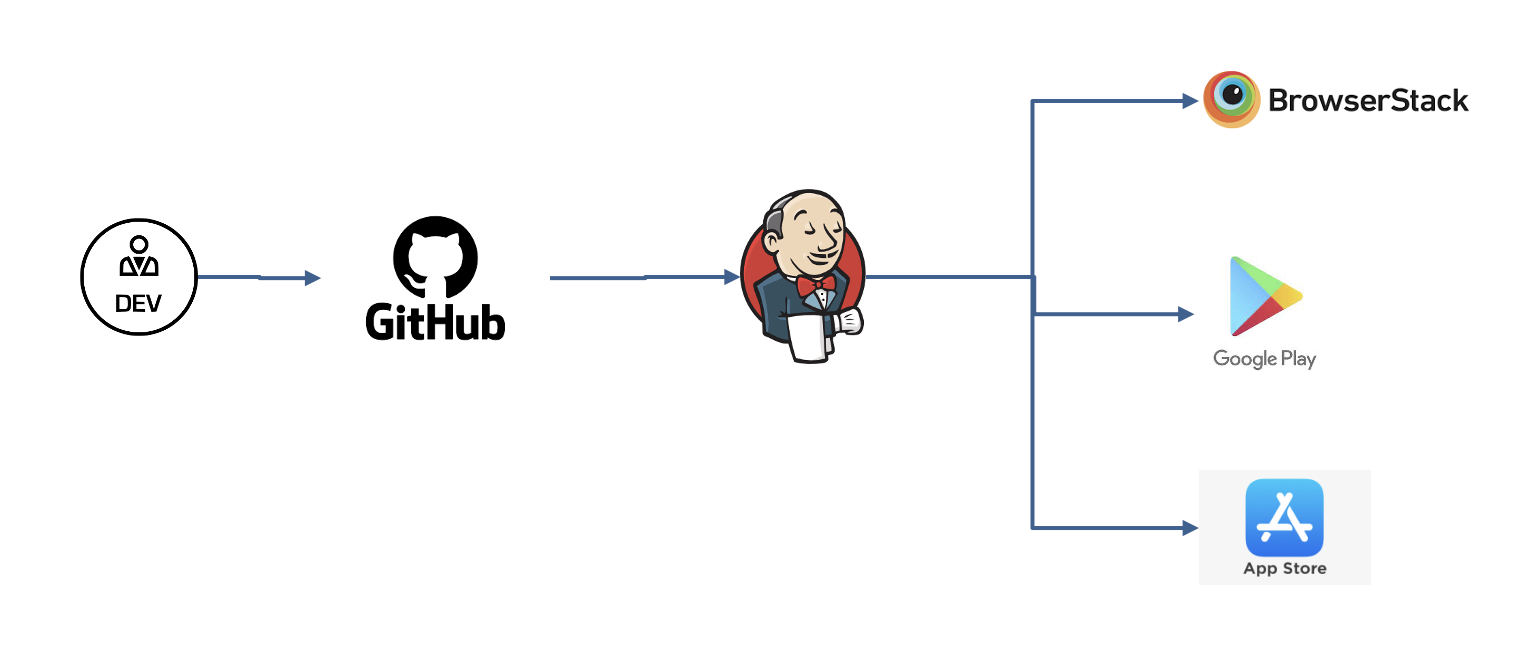
Figure 1. The deployment process at a high level. Developers push their latest code to GitHub, then Jenkins pulls that code into the pipeline described below. The resulting iOS and Android builds are sent out to the app stores or mobile testing platforms such as BrowserStack.
To automate this deployment, we will use a Jenkins Pipeline, which can be created through the Jenkins UI or a Jenkinsfile. Think of the Jenkinsfile as a kind of executable created for the purpose of building pipelines. They’re written in Groovy, but since large chunk of the pipeline are shell commands, you won’t need to know too much Groovy syntax. Below are examples for how to run shell commands in the Jenkinsfile.
// Example to echo variable foo
sh "echo ${foo}"

// Multiline format
sh """
  echo ${foo}
"""
Finally, to follow along you’ll need a working Jenkins account, a mac to run XCode, and an iOS/Android project that is ready for internal testing.
Deploying to the App Store (iOS)
Phase 1: Preparation, Certificates, and Profiles
We are going to begin by setting up the necessary items for deployment through the Apple Developer portal: a team ID, an iOS development signing certificate, and a provisioning profile. We will also create the ExportOptions.plist file, which will be used to upload our app to the App Store.
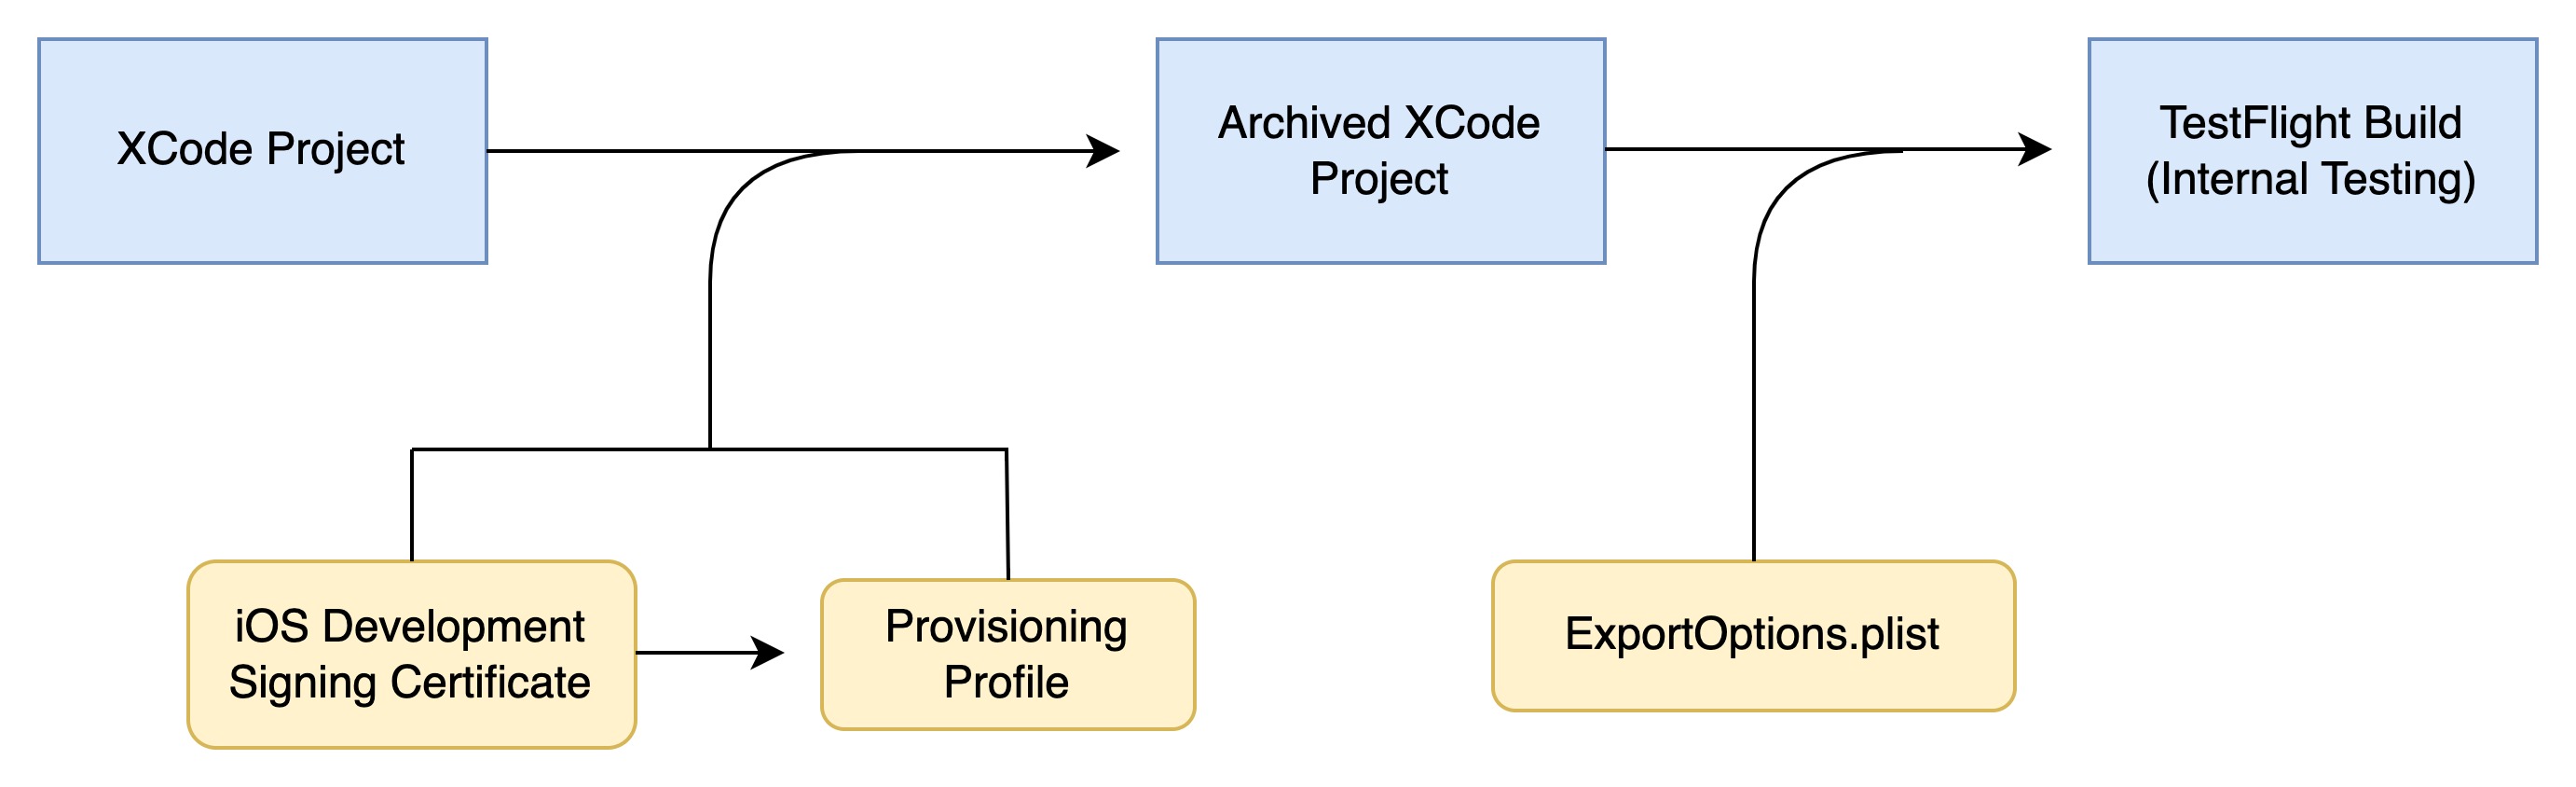
Figure 2. Some of the components we will incorporate into our TestFlight build in this section.
First off, there is no way to deploy to the App Store without using XCode, and there is no way to run XCode without a Mac. As a result, your Jenkins account will need at least one macOS node. You have two options for this: you can rent out a Mac EC2 instance for around $500 per month, or you can buy and connect a brand-new Mac Mini for $699.99 (as of January 2023). You can decide for yourself which option is better for your organization.
Once you buy the Apple Developer account (for a yearly fee of $100), you’ll need to log into your account to create a Provisioning Profile and Signing Certificate. The signing certificate—which is tied to a particular Mac (in this case your Jenkins agent)—gets used by the provisioning profile to determine whether the machine it’s running on is authorized for deployment. This article does a great job at walking through the signing certificate creation process. To avoid the headache of moving certificates between machines, I recommend doing this on the agent node.
For the provisioning profile, you’ll need to go to the Provisioning Profiles page on your Apple Developer portal and hit the plus mark. Select an App Store profile under Distribution, choose your app’s App ID, and in Select Certificates, choose the distribution certificate you just created. Then, generate and download the profile.
In order to reference this profile in the Jenkins pipeline, you’ll need its UUID. You can access this UUID by downloading the provisioning profile, opening it in a text editor or VSCode (not XCode) and looking through the key/value pairs for the UUID field. It should be about 32 characters long and broken up with hyphens. Save this value for later.
The final thing you’ll need is an ExportOptions.plist file. This file, released with XCode 7 in 2016, simplifies the process of deploying to the App Store from the command line. It contains a list of key-value pairs with information on the certificates, provisioning profiles, and the app’s ultimate destination (in this case app-store). I’ve provided an example below—swap in the information for your app and place this file in the top level of your XCode project (next to the Podfile).
<?xml version="1.0" encoding="UTF-8"?>
<!DOCTYPE plist PUBLIC "-//Apple//DTD PLIST 1.0//EN" "http://www.apple.com/DTDs/PropertyList-1.0.dtd">
<plist version="1.0">
<dict>
<key>compileBitcode</key>
<false/>
<key>method</key>
<string>app-store</string>
<key>destination</key>
<string>upload</string>
<key>provisioningProfiles</key>
<dict>
<key>[package identifier]</key>
<string>[provisioning profile uuid]</string>
</dict>
<key>signingCertificate</key>
<string>[signing certificate name (as it appears in Keychain Access)]</string>
<key>signingStyle</key>
<string>manual</string>
<key>stripSwiftSymbols</key>
<true/>
<key>teamID</key>
<string>[your 10-digit team id]</string>
<key>thinning</key>
<string><none></string>
</dict>
</plist>
Phase 2: Versioning
Because every build of your app needs a unique version number (1.0, 1.0.1, 1.1, etc.), you’ll need to set update this number as part of your Jenkins pipeline. Since the distinction between major version, minor version, and revision is best left up to developer discretion, I recommend including the version number as a parameter in the build. Call the version number something like VERSION_CODE, and you’ll be able to access it at the beginning of the pipeline:
env.VERSION_CODE = params.VERSION_CODE
iOS apps also need a number that indicates how many builds it took to get to the current version code, termed a build or build number. Unless you are keeping extensive records of your build history, I wouldn’t worry too much about this field. Our organization’s choice was to set it to be equal to the revision number plus one (so version 1.0.0 is build 1, version 1.0.1 is build 2, and so on):
def isValidVersionCode = (env.VERSION_CODE ==~ /(\d+)\.(\d+)\.?(\d*)/)
if (!isValidVersionCode) {
    error('Invalid version code')
}

def versionCapture = (env.VERSION_CODE =~ /(\d+)\.(\d+)\.?(\d*)/)
def revisionVersionNumber = versionCapture[0][3]
if (revisionVersionNumber == "") {
    patchVersionNumber = 0
} else {
    revisionVersionNumber = revisionVersionNumber as Integer
}

if (revisionVersionNumber == "") {
    env.VERSION_NO = 1
} else {
    env.VERSION_NO = (revisionVersionNumber + 1)
}
Finally, you’ll need to modify the build and version number from the command line. We will do this by directly modifying Project.pbxproj, which contains all the useful metadata for your app—including build and version number. By doing a text search for the field where these two variables are set, we can swap out the variables with our custom parameters (make sure to double check your path to Project.pbxproj and modify these commands accordingly).
def iosBuildFile = readFile file: "App.xcodeproj/project.pbxproj"
iosBuildFile = iosBuildFile.replaceAll("CURRENT_PROJECT_VERSION = 1", "CURRENT_PROJECT_VERSION = ${VERSION_NO}")
iosBuildFile = iosBuildFile.replaceAll("MARKETING_VERSION = 4.2", "MARKETING_VERSION = ${VERSION_CODE}")
writeFile file: "App.xcodeproj/project.pbxproj", text: iosBuildFile
Phase 3: Archiving and Deploying
Now we’re ready to run the commands that archive and deploy our application to the App Store. We will outline the path to a production release, go over the command line tools we will use, and describe each command in detail.
Before your iOS app can be released to the public, it must be submitted to TestFlight, Apple’s beta and internal testing service. From there, you can create a new production release from a TestFlight build, submit it for a review from Apple, and—upon its approval—upload it to the App Store.
If you were performing these steps manually, you would first archive your project on XCode and then distribute it to App Store Connect (the portal for managing your app releases). Using a small CLI named xcodebuild, we can perform this same process from the command line instead.
First, go to the top level of your XCode project. Here, you will clean your workspace and make sure all the proper pods are installed (pods referring to packages from cocoapods, XCode’s package manager):
sh '''
  xcodebuild -workspace [App.xcworkspace] -scheme [YourSchemeName] clean
  pod install
'''
Next we will archive the XCode project, which will require access to certificates stored on your Jenkins node. If you try accessing them directly from the pipeline, however, you’ll likely be denied access. We can get around this by unlocking the keychain on the Jenkins node for one hour:
sh '''
  security unlock-keychain -p [your mac password] ~/Library/Keychains/login.keychain-db
  security set-keychain-settings -t 3600 -l ~/Library/Keychains/login.keychain
'''
The -t 3600 portion indicates that we want the unlock to last 3,600 seconds, or one hour. If this doesn’t work, you may have to log into the Jenkins node directly and run the next command on the UI. This will cause a pop-up asking for a password to unlock the keychain to appear. If you check “always use” on this pop-up, it should resolve the issue.
Also, make sure to use credentials for your mac agent’s password, as it’s always good security practice.
Now we run the archive command, making use of the certificates, provisioning profiles, and identifiers you previously set up. Much like in the ExportOptions.plist file, you’ll need your team ID, provisioning profile UUID, and distribution certificate name.
sh """
  xcodebuild \
      -workspace App.xcworkspace \
      -scheme App \
      -archivePath build/App.xcarchive archive \
      DEVELOPMENT_TEAM='[your 10-digit team id]' \
      CODE_SIGN_IDENTITY='[signing certificate name (as it appears in Keychain Access)]' \
      CODE_SIGN_STYLE='Manual' \
      PROVISIONING_PROFILE_SPECIFIER='[provisioning profile uuid]'
"""
Finally, we run the export command, which will consume the information contained in the ExportOptions.plist file:
sh """
  xcodebuild \
    -exportArchive \
    -archivePath build/App.xcarchive \
    -exportOptionsPlist ExportOptions.plist \
    -exportPath build \
"""
Your app will now begin uploading to TestFlight on the App Store. Congratulations! Just like that, a 20-minute long process on your local machine has been reduced to the click of a button.
Note: It’ll take a few minutes for the build to appear on TestFlight. Once it does, you can enable your app and send it out to testers in your organization.
Deploying to the Play Store (Android)
Phase 1: Creating a Google Service Account, adding it to Jenkins and the Play Console
For the Android deployment, we will begin by setting up a service account to allow us to perform automated deployments to the Play Store. Then we will then write the code to manage versioning. Finally, we will use the Gradle Wrapper to bundle our Android app, and the Google Play Android Publisher to upload it to the Play Store. The best part is, unlike the iOS deployment, this section requires no certificates!
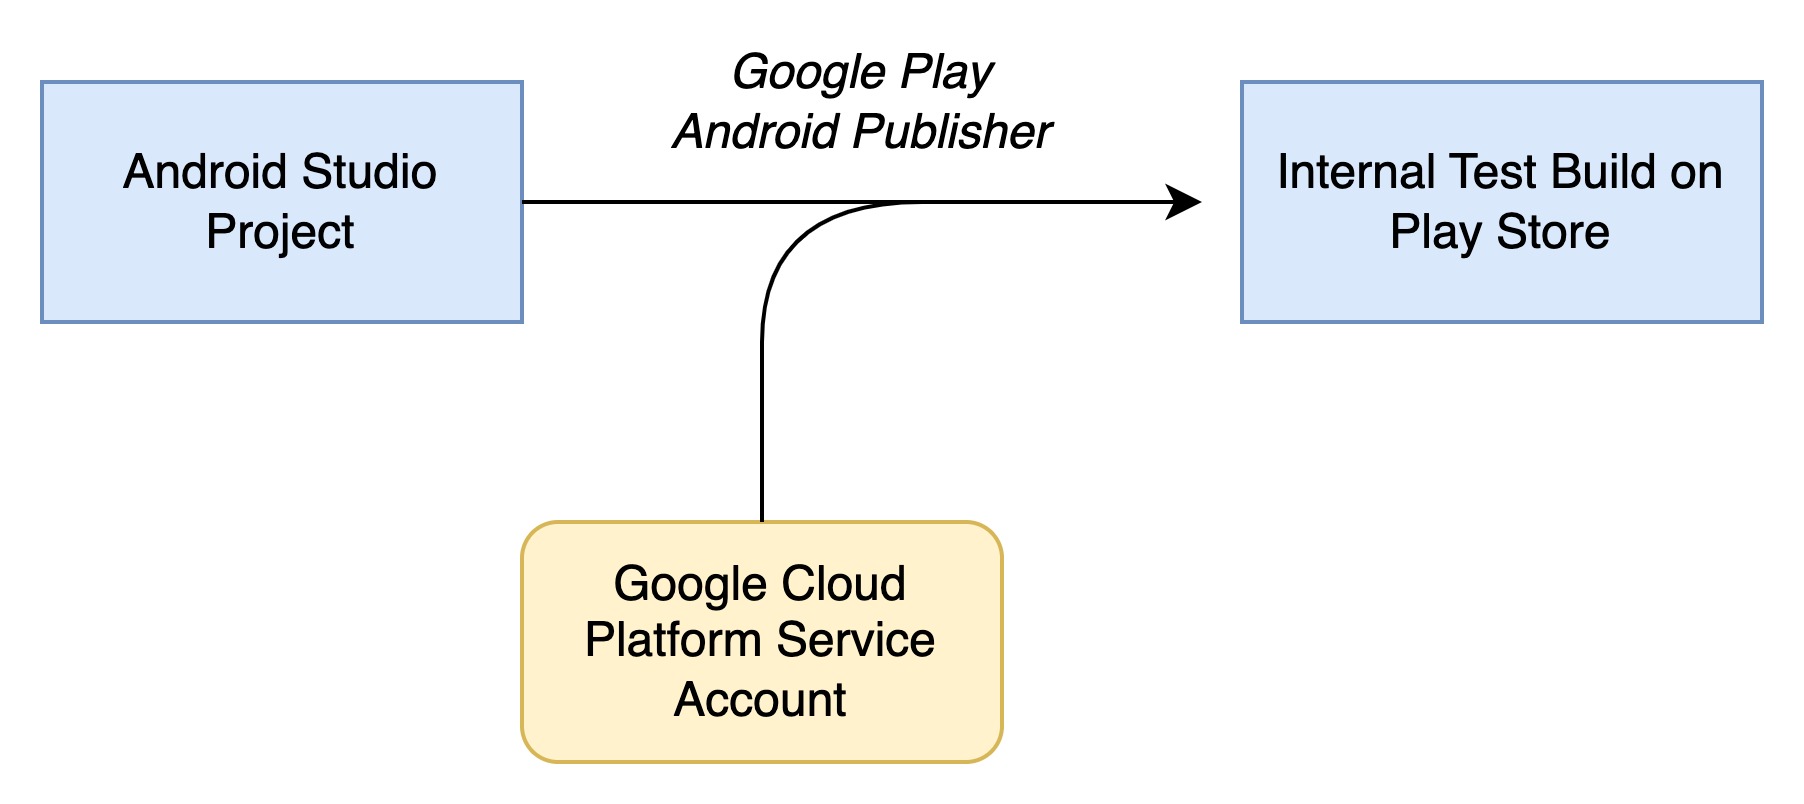
Figure 3. The automated deploy process for the Play Store is simpler than for the App Store, only involving one step rather than two.
Google Play Android Publisher—the Jenkins package we will use to deploy to Google Play—requires a Google Service Account’s login information in order to function. Creating that service account will require you to go through the Google Cloud Platform, a suite of cloud services including accounts designed for automated app deployments.
Before beginning, you must release a build manually all the way to production through the Google Play Console. Once you’ve done that, you can follow the steps on the Google Play Android Publisher’s page, under the “Setup” section (https://plugins.jenkins.io/google-play-android-publisher/). The service account will be treated as a user by the Google Play Console, allowing it to deploy the app from your Jenkins pipeline.
Once the service account is set up, you’ll need to install the Jenkins plugin Google Play Android Publisher and add the service account’s login and password as credentials. Instructions for this step are available here.
Phase 2: Versioning
Next we will extract a build number from the developer-set version number, just as we did for the iOS build. Note that unlike the App Store, Google Play requires new build numbers to be higher than all previous build numbers. You can use the following formula to set your build numbers:
def buildNumber = revision + (minorVersion * 100) + (majorVersion * 10000)
With the above formula, 1.0.0 becomes 10,000, 1.0.5 becomes 10,005, 1.5.3 becomes 10,503, and so on. So long as you don’t exceed 100 revisions per minor version and 100 minor versions per major version, this formula will always work.
Phase 3: Building and Releasing
Finally, we will build the Android project into a bundle and upload it to the Play Store. You can do this by calling gradlew, which fetches the latest version of Gradle, the Android Studio build tool. Using gradlew, you can turn your project into a deploy-ready bundle with a single line:
sh './gradlew clean bundle'
This will create an AAB file in the app/build/outputs/bundle/release directory (AABs are like APKs, but with a higher level of variability between devices. They are the counterpart to the App Store’s IPA files). Next, we will upload the app to the Play Store using the Google Play Android Publisher plugin and the Google Service account credentials:
androidApkUpload googleCredentialsId: [google service account credentials name],
  filesPattern: 'app/build/outputs/bundle/release/*.aab',
  trackName: 'internal',
  rolloutPercentage: '100',
  releaseName: 'Internal Release {versionName} ({versionCode})'
And there you have it. Within a few minutes, your internal test track will contain your latest build. From there, testers will have access within a few minutes.
If you’ve made it this far, congratulations. You may need to make modifications to the steps outlined above based on you and your organizations’ unique needs, but hopefully this tutorial has served as a useful overview. However they turn out, deployment automation pipelines will always pay you dividends many times over in time saved and in mistakes avoided. So enjoy your newfound free time and productivity. 😎
At Lean Innovation Labs, we love to automate using DevOps methodologies. In doing so, we help our clients achieve greater efficiency and speed in their software development projects. If you want to take your software development to the next level, reach out to us at Lean Innovation Labs for expert guidance and support in implementing DevOps practices.